How to Create and Manage Content Lifecycle Policies
Content Lifecycle Policy in VIDIZMO aims to reduce storage and access costs while introducing better content management. It provides an intuitive way to create, edit, and prioritize content policies on your Portal to delete, purge or change the storage tier for your Portal content.
If you have an Azure storage that supports tiers configured as your storage provider, you can create policies for moving content into (or from) access tiers: Hot, Cool, and Archive. Each tier has varying access speed and storage costs. You can also determine whether these policies run manually or automatically.
Prerequisites
- Ensure you belong to a security group or have a CAL that has permission to create content lifecycle policies on your Portal.
- To utilize access tiers and create change tier policies, ensure an Azure storage is set up as your Portal’s storage provider and select the content types you want to store in the access tiers.
- For On-Premises deployment, see How to Configure Azure Storage with VIDIZMO On-Premise Encoder.
- For SaaS or Cloud deployment, see How to Configure Azure Storage with VIDIZMO Cloud Encoder.
Enable Content Lifecycle Policies
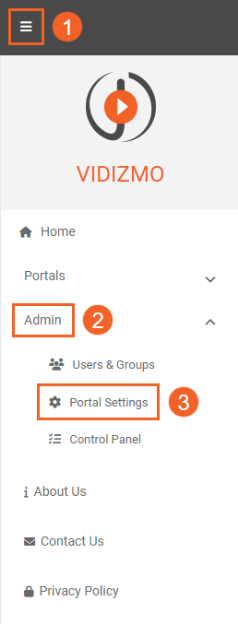
- Open the navigation pane using the top-left button.
- Click the ‘Admin’ dropdown.
- Select ‘Portal Settings.’
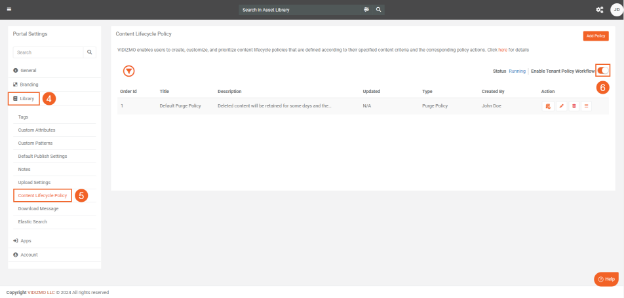
- In Portal Settings, click ‘Library.’
- Select 'Content Lifecycle Policy' to begin managing your content policies.
- Enable the workflow to allow the execution of content lifecycle policies on your Portal.
Create a Content Lifecycle Policy
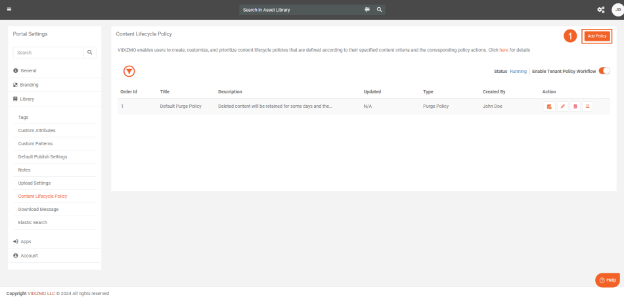
- Use the ‘Add Policy button’ to create a new policy.
-
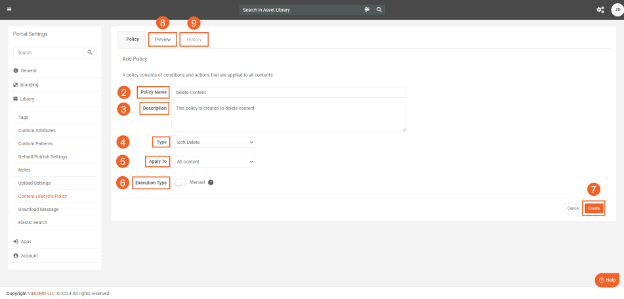
Enter a unique and descriptive name for your Policy
-
Include a policy description which consists of relevant details.
-
Select the kind of policy you wish to create from the ‘Type’ dropdown.
-
In the ‘Apply To’ dropdown, select which Portal content will be affected by your content policy.
-
Use the toggle button to decide on the ‘Execution Type.’ Turn the toggle on to enable automatic execution or turn it off to restrict the policy for manual execution only.
-
Click the 'Create' button to finalize creating the policy.
-
Click the 'Preview' tab to see the Portal content being affected by the policy.
-
Click the 'History' tab to see the policy logs. This option is unavailable here since you are creating a new policy, and it has no logs.
Create a Soft Delete Policy
When a ‘Soft Delete Policy’ is executed, the Portal content complying with this policy goes to your Portal's Recycle Bin.
- Add a new policy and set its 'Type' to 'Soft Delete.'
- Click 'Create' to finalize creation.
Create a Purge Policy
When a ‘Purge Policy’ is executed, the content in the Recycle Bin complying with this policy is permanently deleted or purged from your Portal.
- Add a new policy and set its 'Type' to 'Purge Policy.'
- Provide the number to specify the number of days that a specific piece of content has been deleted for. The policy will act on the content that has been in the recycle bin for more than the number of days specified in this field.
- Click the preview tab to view the content in the Recycle Bin that the policy execution will purge.
- Click 'Create' to finalize creation.
Note: VIDIZMO creates a Purge Policy by default whenever a Portal is made. You can edit it like any other content policy.
Create a Change Tier Policy
Change tier policies become available when you are using an Azure storage on your Portal. When a 'Change Tier Policy' is executed, the Portal content moves to the access tier specified in the 'Policy Action'.
- Add a new policy and set its 'Type' to 'Change Tier'
- Select a 'Policy Action' to determine what the change tier policy will do.
- From the 'Select Priority' dropdown, choose the rehydration priority for content being unarchived. See Rehydration for more information.
- Click 'Create' to finalize creation.
You can also perform change tier activities on your Portal content without lifecycle policies, refer to Utilizing Azure Access Tiers in VIDIZMO.docx for more.
Content Selection Criteria
- From the 'Apply To' dropdown, determine how you want to select or target the Portal content for the policy execution.
- If ‘All Content’ is selected, the policy will apply to all content in your Portal. However, if the 'Policy Type' is 'Purge Policy', then all content means everything inside the Recycle Bin.
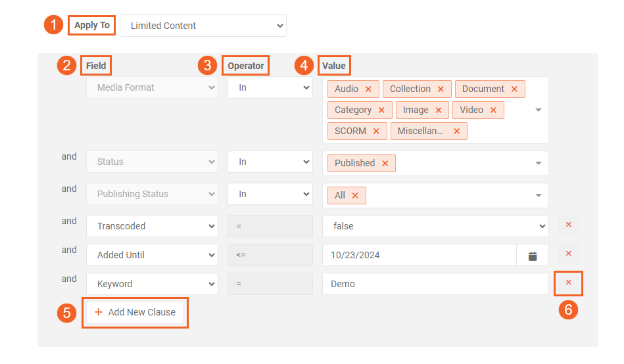
- If 'Limited Content' is chosen, you can define a criteria using clauses for more specified content selection. Each clause is comprised of a Field, Operator, and Value.
Note: When defining your criteria, you'll find a few clauses that cannot be removed as they are mandatory for content selection. Their Fields cannot be modified, but you can change their Operators and Values.
- The Field defines a scope for your Portal content. It contains options for where your content is present, its status, and other attributes.
- The Operator determines the relation between the Field and Value columns.
- The Value column consists of information or ‘values’ that help identify what will be selected for policy execution. The inputs in the Value column depend on what Field and Operator are selected.
- You can use the Add New Clause button to create another clause to refine or specify your content selection.
- To remove a clause, click the 'x' button next to it.
Preview Tab
The Preview screen displays content that meets the 'Apply To' criteria, along with their details. When the content lifecycle policy is executed, the 'Policy Action' will be applied to all the content present here.
- The 'Titles' column shows the content that will be affected. You can click these titles to open the content in a new tab on the browser.
- You can use the menu under ‘Actions’ to lock or unlock content on the preview screen to prevent them from being affected by the policy action. You can also identify whether an item is locked or unlocked by the icon in the ‘Locked’ column. For more information, see: Use Lock in VIDIZMO to Restrict Content Archiving.
- You can also selectively apply the policy action on the content by selecting them via their checkboxes, and then clicking the “Apply” button.
- To customize columns on the Preview screen, click the ‘Edit Column’ button.
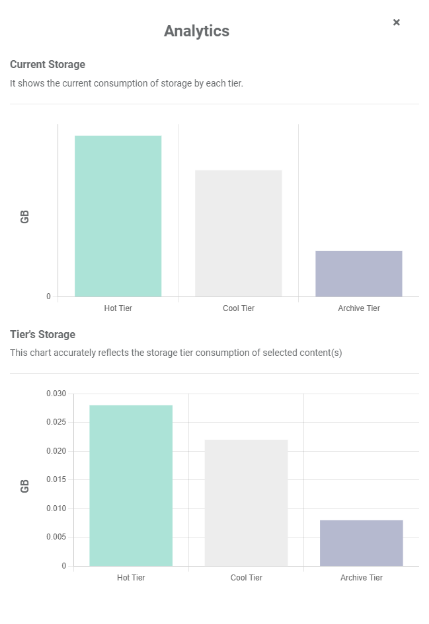
- The Analytics Chart button is available only for Change Tier policies. Click it to view information related to the storage consumption of each Azure access tier on your Portal.
Column Options
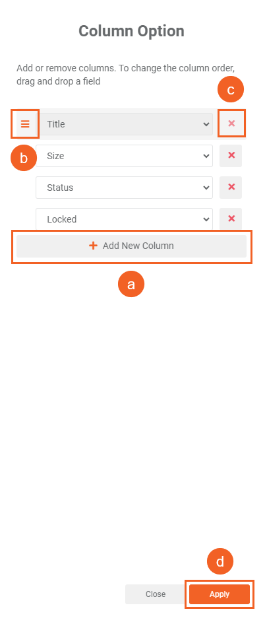
Columns in the Preview screen to display more information about affected files. You can alter them according to your preferences.
a. Add a new column via the ‘Add New Column’ button. b. Reorder the column by dragging the icon next to their name. c. Remove columns using the 'x’ icon. d. Use the Apply Button to save your adjustments.
Analytics Chart
The Analytics pane displays two charts that show your current Azure Storage status and then the storage status after policy execution.
History Tab
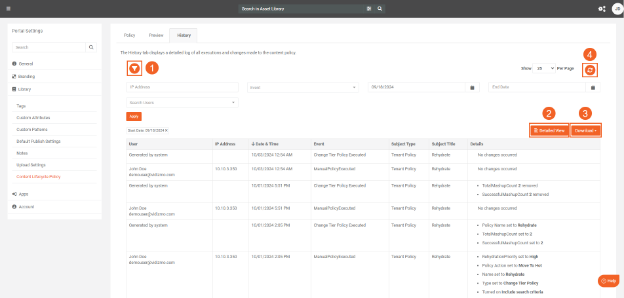
The History tab displays a log that documents any changes to a policy and all instances of its execution since its creation. The log also displays information such as how the policy was executed, who executed it and how many files were affected by the policy action. You can also perform the following actions in this section:
-
Use the Filter Icon to create a specified query for certain logs.
-
Use the button switch between Compact and Detailed View.
-
Use the Download button to download the logs in a CSV or PDF.
-
Use the Refresh button to see the updated logs.
Manage Content Lifecycle Policies
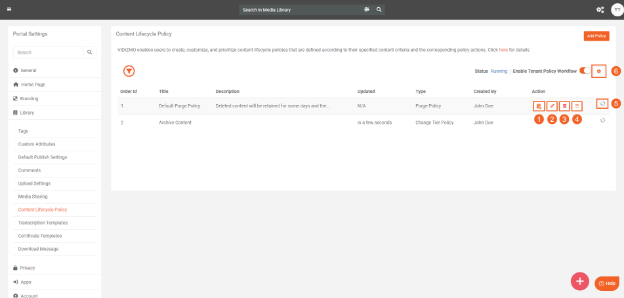
You can perform several actions for your created policies on the Content Lifecycle Policy page.
- The ‘Run Policy’ button allows you to manually execute a policy, even if it is set to automatic.
- The ‘Edit’ button allows you to go into an existing policy’s settings.
- The ‘Delete’ button will remove the content lifecycle policy.
- Use the 'Reorder' button to drag and arrange your content policies, which will change their 'Order ID' and prioritize them for automatic execution. The 'Order ID' dictates the automatic execution order for content lifecycle policies; the policy at the top has the highest priority.
- You can determine which policies are currently running by the loading icon.
- Click the Settings button to set the time interval for the automatic policy execution.
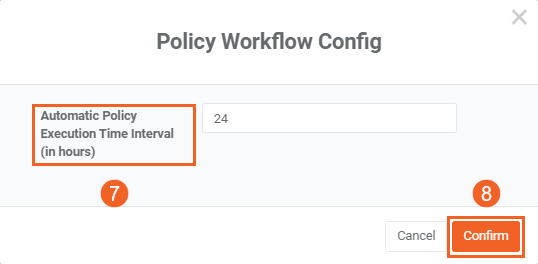
- On the Policy Workflow Config window, provide the time interval in hours.
- Click 'Confirm' to save the changes.
For more information regarding Content Lifecycle Policies, visit Understanding Content Lifecycle Policies in VIDIZMO.